If you are researching how to prep concrete for epoxy, you have already figured out the most important thing about epoxy coatings: they do not fail because of the epoxy. They fail because of the floor underneath it. Epoxy bonds mechanically to concrete — it grips the texture of the surface — and if that surface is smooth, sealed, dusty, damp, or contaminated, even the most expensive coating peels, bubbles, or delaminates within a year. This guide explains what proper preparation actually involves, what a surface profile is, how the main prep methods compare, the step-by-step process professionals follow, and the mistakes that cause most epoxy failures in Florida garages, shops, and warehouses.
Why Surface Prep Matters More Than the Coating
Cured concrete looks porous, but a finished slab is usually anything but. Troweling brings fine cement paste (laitance) to the top, curing compounds and sealers get applied, and years of use add oil, tire residue, and grime. Epoxy applied over any of that is bonding to a weak or slick layer — not to the structural concrete. When that layer lets go, the coating goes with it.
Proper prep does three things at once: it removes laitance, sealers, and contamination down to sound concrete; it opens the pores so the epoxy can wet into the slab; and it creates a measurable texture — the surface profile — that multiplies the bonding area. Coating manufacturers are blunt about this: nearly every epoxy data sheet makes its warranty conditional on correct surface preparation.
Concrete Surface Profile (CSP) Explained
The industry measures prepared concrete texture on the Concrete Surface Profile scale, CSP 1 through CSP 10, where CSP 1 is nearly smooth and CSP 10 is heavily roughened. Thin coatings like sealers want a light profile; standard garage and shop epoxies typically specify around CSP 2–4; thick, high-build or mortar systems want more. The number matters because profile is a specification, not a guess: too little texture and the coating cannot grip, too much and thin coatings cannot cover the peaks, leaving pinholes. Surface preparation standards from organizations like SSPC (the Society for Protective Coatings, now part of AMPP) exist precisely so a contractor and a coating manufacturer mean the same thing by “properly prepared.”
Prep Methods Compared
| Method | What it does | Best for | Limitations |
|---|---|---|---|
| Acid etching | Mild chemical roughening | DIY budget jobs on bare, unsealed concrete | Cannot remove sealers or coatings; inconsistent; leaves residue that must be neutralized and rinsed |
| Diamond grinding | Abrades the top layer flat | Light profiles (CSP 1–2), smoothing high spots | Can polish rather than open the surface; struggles with soft coatings that gum up discs |
| Shot blasting | Throws steel shot at the slab and recovers it | Large open floors needing CSP 3–5 | Equipment needs space; edges and tight areas need other tools |
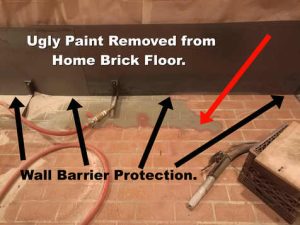
| Abrasive (sand) blasting | Cuts coatings and profiles in one step | Removing paint, sealers, and epoxy; profiling odd shapes, edges, vertical surfaces | Dust without suppression — which is why we run dustless blasting on occupied sites |
| Scarifying | Milling wheels chew the surface aggressively | Heavy buildup, aggressive profiles | Too aggressive for most coating work; leaves ridges |
The practical summary: grinding excels at flattening, shot blasting at big open floors, and abrasive blasting at the messy real-world jobs — slabs with old paint or sealer, edges and corners, ramps, vertical faces, and anywhere a previous coating has to come off before a new profile goes on. That removal-plus-profile combination is exactly what our concrete sandblasting service does in a single pass.
Step-by-Step: How Professionals Prep Concrete for Epoxy
- 1. Test for moisture. Concrete transmits ground moisture, and epoxy is a vapor barrier — trapped moisture is the classic cause of bubbling. A simple plastic-sheet test (tape down plastic for 24 hours and look for condensation) flags problem slabs; meters and calcium chloride tests quantify it.
- 2. Identify what is on the slab. Drip water on the surface: if it beads, a sealer or coating is present and must be fully removed — not etched, not scuffed.
- 3. Degrease. Oil soaks into concrete and wicks back up through fresh coatings. Heavily stained spots get degreased before blasting so the abrasive cleans concrete, not smeared oil.
- 4. Repair cracks and spalls. Structural cracks, joints, and spalled areas are cut out and filled so the finished floor is continuous.
- 5. Blast to the specified profile. Media and pressure are matched to the slab and the coating spec — enough to open the pores and hit the target CSP, not so much that a thin coating cannot cover the texture.
- 6. Vacuum and inspect. Every bit of dust and spent media comes up; remaining dust is a bond-breaker. The profile is checked across the floor, including edges and corners where failures usually start.
- 7. Prime within the window. Fresh-blasted concrete is at its most receptive immediately after prep. In Florida humidity we coordinate prep and coating tightly — ideally the primer goes down the same day, which we handle through our painting and coating services.
Common Mistakes That Make Epoxy Fail
- Skipping the moisture test. The number-one cause of bubbled garage floors — no prep method fixes a slab that needed a moisture-mitigating primer.
- Acid etching over a sealer. Acid cannot remove what is essentially plastic; the epoxy bonds to the sealer and peels in sheets.
- Coating a dirty or dusty slab. Dust is a powder release agent between the floor and your coating.
- Wrong profile for the product. Thin epoxies over an aggressive profile pinhole; thick systems over polished concrete slide.
- Waiting too long after prep. An open, profiled slab picks up contamination and moisture every day it sits bare.
- Treating edges as an afterthought. Peeling almost always starts at edges, drains, and joints — the spots hand tools missed.
DIY or Professional?
For a small interior room on bare, never-sealed concrete, a rented grinder and careful work can produce an acceptable result. Call a professional when any of these are true: there is an existing coating or sealer to remove; the area is large or includes edges, ramps, or vertical surfaces; the coating spec names a CSP or SSPC standard; the slab has oil staining or moisture history; or the project is a business where a failed floor means closing again next year to redo it. Professional prep is a fraction of the total floor cost and it is the part that decides whether the floor lasts fifteen months or fifteen years. We blast and profile concrete across Gainesville and Alachua County — garages, shops, warehouses, restaurants, and showrooms — and give you the slab condition honestly, including moisture concerns, before any coating goes down. You can see typical pricing in our sandblasting cost guide.
The Florida Factor: Moisture and Humidity
Concrete prep advice written for Arizona does not survive contact with a Florida slab. Our water table is high, many slabs were poured without an effective vapor barrier, and ambient humidity keeps everything damp longer. That makes the moisture test non-negotiable here — a slab that looks bone dry in June can transmit enough vapor to blister a coating by September. When a slab tests wet, the answer is not to skip the floor; it is to use a moisture-tolerant primer or mitigation system under the epoxy, which your coating supplier can specify once you have real numbers. Humidity also shortens the window between prep and prime: an open, profiled slab absorbs moisture from the air, so in Gainesville we schedule blasting and priming as one continuous operation rather than prepping on Friday and coating “sometime next week.”
Epoxy Prep FAQs
Can I just acid etch my garage floor? Only if the concrete is bare, unsealed, and you are using a forgiving DIY coating. Etching cannot remove sealers or old paint, and most peeling DIY floors started with an etch over something that needed removal.
How do I know if my floor has a sealer on it? Pour a little water on it. If it soaks in and darkens the concrete within a minute, the surface is open. If it beads or sits on top, there is a sealer or coating that must come off first.
What profile does my epoxy need? Check the product data sheet — it will name a CSP range. Most residential and light-commercial epoxies want roughly CSP 2–4, which abrasive blasting hits reliably.
How long does professional prep take? A typical two-car garage is usually profiled, vacuumed, and ready for primer in a day, including edges. Larger commercial floors scale with area and condition.
Does new concrete need prep too? Yes — new slabs need to cure (commonly 28 days) and still carry laitance and possibly curing compound, both of which must come off before coating.
Need sandblasting in Gainesville or nearby? Call 352-663-1129 for a free on-site estimate.