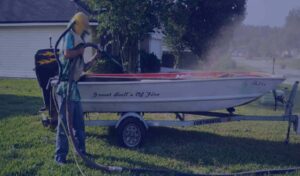
If you are about to powder coat a trailer frame, a set of patio chairs, a boat trailer, or a stack of fabricated steel, the prep matters more than the coating itself. Sandblasting before powder coating is what gives that finish something to grab onto. Powder coat looks tough — and it is — but it is only as durable as the surface underneath it. Skip the blasting, or do it halfway, and even a flawless coat will bubble, chip, or peel within a season or two, especially in the heat and humidity around Gainesville. This guide explains why abrasive blasting is the standard prep step, what a properly blasted surface looks like, and what actually goes wrong when you cut the corner.
What powder coating needs from the surface
Powder coating is a dry finish: electrostatically charged powder is sprayed onto a grounded metal part, then baked in an oven until it melts and flows into a hard shell. For that shell to bond, the metal underneath has to be two things at once — chemically clean and mechanically rough. Chemically clean means no oil, grease, rust, mill scale, or old coating. Mechanically rough means a microscopic texture, called a surface profile or anchor profile, that the melted powder can lock into.
A smooth, shiny piece of steel is actually a poor surface to coat. There is nothing for the powder to key into, so adhesion depends entirely on a chemical bond that contaminants and Florida moisture will eventually break. Blasting solves both problems in a single pass — it strips the surface clean and leaves the right profile at the same time.
Why sandblasting is the standard prep step
Other prep methods exist — hand sanding, grinding, chemical strippers, phosphate washes — but abrasive blasting is what coaters and fabricators rely on because it does the most in the least time. When we handle metal sandblasting in Gainesville for parts headed to a powder coater, we aim for a clean, uniform near-white finish with a measured profile, usually in the 1.5 to 3 mil range depending on the coating spec.
Those cleanliness grades are not arbitrary. The standards most powder coaters reference come from SSPC/NACE — for example SSPC-SP 10 (near-white blast) or SSPC-SP 5 (white metal) for the most demanding work. If you want the detail on what those grades mean, our guide to SSPC surface prep standards breaks them down. The short version: the cleaner and more uniform the blast, the longer the powder coat lasts.
Media choice matters too. Angular media like crushed glass or aluminum oxide cuts a sharper profile for heavy steel, while finer media is used on lighter or thinner parts that would warp under aggressive blasting. Matching the abrasive to the part is the difference between a coat that lasts a decade and one that fails early — which is part of why this is rarely a good guess-and-check job. Our explainer on media blasting and abrasive types covers how those choices are made.
What happens if you skip blasting
Powder coat over a poorly prepped surface fails in predictable ways. Here is what each shortcut tends to cause:
| What was left on the metal | How the powder coat fails |
|---|---|
| Rust or mill scale | Coating lifts and flakes as corrosion keeps spreading underneath |
| Oil or grease residue | Fisheyes, poor adhesion, and blisters during the bake |
| No surface profile (too smooth) | Chips at edges and impact points, then peels in sheets |
| Old paint or coating | Outgassing and pinholes in the oven, uneven finish |
| Flash rust from humidity | Bond breaks early, with brown bleed-through |
The frustrating part is that none of these show up on day one. A bad prep job and a good prep job can look identical coming out of the oven. The difference appears months later when the coat starts releasing — and by then the only fix is to strip it all off and start over, paying for blasting and coating twice.
The blast-to-coat workflow and the Florida humidity problem
Timing is the part people underestimate. Once steel is blasted to bare, clean metal, it starts to oxidize immediately — and in Gainesville humidity, flash rust can form within hours. Even a faint flash-rust film is enough to compromise adhesion. That is why blasted parts need to be coated quickly, kept dry, and handled with clean gloves, since skin oils alone can contaminate a blasted surface.
A typical workflow looks like this: blast to the specified profile, blow the part down and inspect it, move it to a controlled space, and coat it within the safe window — the same day whenever possible. For parts that also need primer or a multi-coat system, the same logic applies; you can see how we stage blasting with finish work on our painting and coating services page. Blasting and coating are really one continuous process, not two jobs separated by a week in a damp garage.
DIY vs. hiring a pro
For a few small hobby parts, a pressure-pot blaster and a home powder gun can work — as long as you understand profile, contamination, and the flash-rust clock. Where DIY usually falls apart is uniformity and containment: getting an even profile across a whole trailer or railing, capturing spent media, and wearing proper respiratory protection. Abrasive blasting throws fine dust and, on older coatings, can release lead, which is why OSHA publishes specific safety requirements for abrasive blasting.
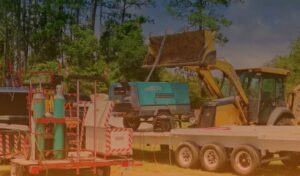
For anything structural, large, or going to a paying customer, it pays to have the blasting done right. We bring a mobile unit to your location anywhere in Alachua County, blast to the profile your coater needs, and hand off parts that are ready to coat.
How to tell if a part was blasted properly
If you are paying someone else to blast parts before you coat them — or checking your own work — a few signs separate a coating-ready surface from one that will fail. The metal should be a uniform, dull gray with no shiny spots; any remaining gloss means old coating or mill scale is still there. There should be no visible rust, no dark scale, and the surface should feel evenly textured rather than slick. Run a clean, gloved hand over it: you should pick up no oily film and no loose dust. On a humid Florida day, a faint brown haze forming within hours is flash rust, and it means the part needs a re-blast or a light re-clean before it goes in the oven.
Profile depth is harder to eyeball, which is why coaters use a profile gauge or replica tape to confirm the anchor pattern hits the spec. You do not need to measure it yourself, but knowing it matters helps you ask the right question: how deep a profile are you blasting to? A blank stare is a red flag; a number is a good sign.
Parts we commonly prep for powder coating
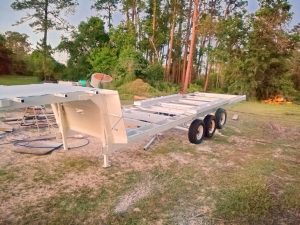
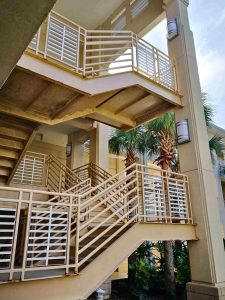
Around Gainesville and Alachua County, the parts that come to us for blast-and-coat prep tend to repeat. Trailer frames and utility trailers top the list — they rust hard in this climate and need bare-metal prep before a durable coat. Wheels and rims are close behind, along with patio and outdoor furniture that has chalked or rusted in the sun. We also see a steady stream of fabricated steel: brackets, railings, gates, fencing, equipment frames, automotive and motorcycle parts, and machine components headed to a coater.
Each of those has its own quirks. Cast parts hold grease in their pores and need extra cleaning. Thin sheet metal and aluminum need lighter media and pressure so they do not warp. Hollow tube and channel trap media and moisture, so they have to be blown out thoroughly before coating. Matching the approach to the part is exactly the judgment that keeps a finish from failing — and it is why we look at the actual piece before quoting.
Does the type of coating change the prep?
Yes, within limits. A heavy-duty industrial powder over steel that will live outdoors wants an aggressive near-white blast and a healthy profile so the coating can resist Florida weather for years. A decorative powder on an indoor piece can sometimes get by with a lighter commercial blast. Multi-stage systems — a zinc-rich primer under a topcoat, for example — carry their own profile and cleanliness requirements. The safe rule is to blast to the most demanding spec the finish calls for, because under-prepping is the failure mode that costs you the whole job twice.
Sandblasting before powder coating: FAQs
Do I really need to sandblast if the metal looks clean? Yes. “Looks clean” and “coating-ready” are different things. Even bright, rust-free steel usually lacks the profile powder needs and carries invisible oils. A quick blast guarantees both cleanliness and profile.
Can you blast aluminum and lighter metals for powder coating? Yes, with the right media and lower pressure so the part does not warp. Aluminum, steel, and cast parts each get a slightly different approach.
How soon after blasting should the part be coated? As soon as possible — ideally the same day. In Florida humidity, flash rust can start within hours, so we plan blasting around the coating schedule.
Will blasting remove old powder coat? Yes. Abrasive blasting strips failed powder, paint, and rust back to bare metal so a new coat has a sound foundation instead of bonding to a failing one.
Need sandblasting in Gainesville or nearby? Call 352-663-1129 for a free on-site estimate.